

Dolphin Anty is a browser designed for managing multiple accounts anonymously on one device. It isolates profiles with unique fingerprints, ensuring accounts remain unlinked. However, anonymity requires proxies to mask IP addresses and avoid detection. This guide explains how to configure proxies in Dolphin Anty, covering proxy types, setup, testing, and troubleshooting.
Key Takeaways:
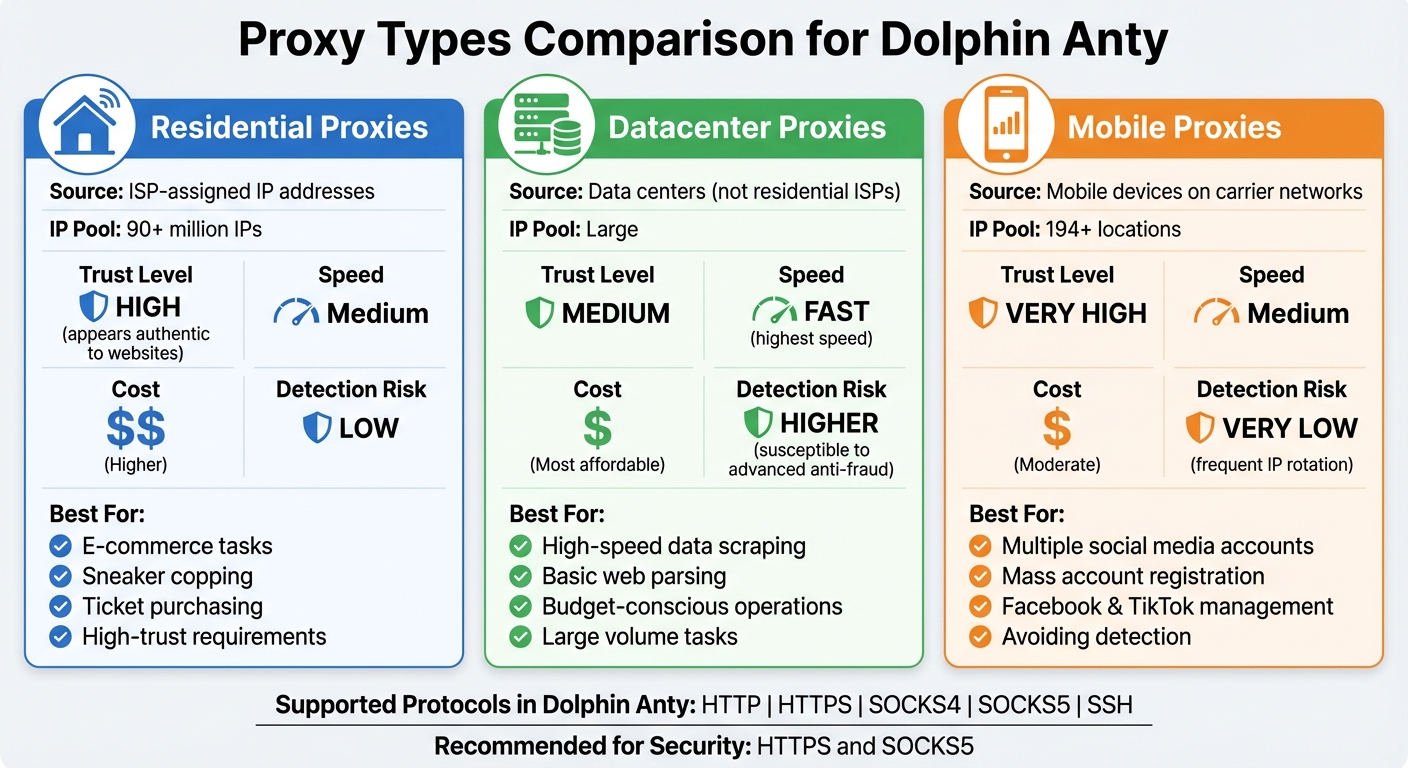
- Proxy Types: Residential (best for trust), Datacenter (fast and affordable), Mobile (ideal for avoiding detection).
- Supported Protocols: HTTP, HTTPS, SOCKS4, SOCKS5, SSH.
- Setup: Add proxies via the Proxies tab or profile settings, test connections, and ensure correct formatting (
host:port,host:port:login:password, orlogin:password@host:port). - Best Practices: Use one proxy per profile, match proxy location to account region, and avoid rotating IPs during sensitive sessions.
- Troubleshooting: Fix errors by checking credentials, formatting, or protocol mismatches.
By following these steps, you can securely manage multiple profiles while minimizing detection risks.
How to Setup Proxy on Dolphin Anty | Anti-detect Browser Tool

Proxy Types and Their Use Cases
Dolphin Anty Proxy Types Comparison: Residential vs Datacenter vs Mobile
Residential, Datacenter, and Mobile Proxies Explained
Residential proxies rely on IP addresses assigned by internet service providers (ISPs), which makes them appear authentic to websites. With access to pools exceeding 90 million IPs, they’re perfect for tasks that demand a high level of trust and reliability.
Datacenter proxies originate from data centers instead of residential ISPs. They’re known for their speed and affordability, making them a good fit for high-speed tasks and basic web scraping. However, they’re more susceptible to detection by advanced anti-fraud systems.
Mobile proxies channel traffic through actual mobile devices connected to carrier networks, with availability in over 194 locations. These proxies frequently rotate IPs, boosting security and making them ideal for activities where avoiding detection is critical - like managing multiple social media accounts or mass account registrations on platforms such as Facebook and TikTok.
Dolphin Anty supports all these proxy types, ensuring flexibility and security for a range of tasks.
Proxy Protocols Supported by Dolphin Anty
Dolphin Anty is compatible with various proxy protocols, including HTTP, HTTPS, SOCKS4, SOCKS5, and SSH. For most automation workflows, HTTPS and SOCKS5 are the go-to choices because they offer better security and anonymity. On the other hand, HTTP and SOCKS4 provide basic functionality and are better suited for less sensitive operations.
This range of protocols allows users to adapt their proxy configurations to match specific automation requirements.
How to Choose the Right Proxy Type
Selecting the right proxy depends on the task at hand:
- E-commerce tasks like sneaker copping or ticket purchasing: Residential proxies are your best bet to avoid triggering security systems.
- Managing multiple accounts on social media platforms or crypto exchanges: Mobile proxies with IP rotation offer stronger protection against detection.
- High-speed data scraping or parsing on a budget: Datacenter proxies can efficiently handle large volumes of data while keeping costs low.
Additionally, it’s crucial to align the proxy’s geographic location with the account’s region. For instance, use a Brazilian proxy for accounts targeting Brazil to reduce the likelihood of security checks. If your workflow demands numerous IP addresses for managing multiple profiles, mobile proxies with rotation are often a more cost-effective solution than purchasing individual residential IPs.
How to Configure Proxies in Dolphin Anty
Adding a New Proxy
You can add proxies in Dolphin Anty either while creating or editing a profile or directly through the Proxies tab in the left sidebar. To add a proxy via the Proxies screen, head to the Proxies section and click the "+" button. If you're setting it up while creating a profile, select Create Profile, scroll down to the Proxy section, and click New Proxy.
When entering proxy details, you'll need to specify the protocol (HTTP, SOCKS4, or SOCKS5), the host or IP address, and the port number. For private proxies, include your username and password. If you're using rotating or mobile proxies, utilize the "Link to change IP" field to paste the rotation URL provided by your proxy provider. This setup adds an IP-refresh button directly to your browser profile screen. Once entered, test your setup to ensure everything is working as expected.
Testing Your Proxy Connection
After adding your proxy, make sure it’s functioning correctly by clicking the Check connection button. A successful test will display the proxy’s IP address, geographic location (country and city), and timezone right below the input field. If there’s an issue - like incorrect credentials or an unreachable server - Dolphin Anty will show an "ERROR" status.
"Dolphin Anty will return 'ERROR' if you enter the wrong credential. Once you've inserted the correct information, your proxy will be active." - Khaled Bentoumi, Software Engineer, anyIP
It’s a good idea to run this test before saving your proxy details to catch any issues early. If you're managing multiple proxies, you can use the checkboxes in the Proxies section to select several at once and verify them all by clicking the Check connection button in the bottom action bar.
Correct Proxy Data Formatting
After entering your proxy details, ensure the data is in the correct format. Dolphin Anty supports three standard input formats: host:port, host:port:login:password, or login:password@host:port. You can also explicitly specify the protocol by using a prefix like socks5://login:password@host:port. Using the correct format helps minimize configuration errors.
| Format Type | Example |
|---|---|
| Basic (No Auth) | 192.168.0.1:8000 |
| Standard Auth | 192.168.0.1:8000:admin:secret123 |
| Alternative Auth | admin:[email protected]:8000 |
| Full (with Protocol) | socks5://admin:[email protected]:8000 |
For the most reliable setup, use the full format with the protocol prefix, especially when dealing with different proxy types. Always double-check that the protocol matches the one specified by your proxy provider, as selecting the wrong protocol is a common reason for connection issues.
sbb-itb-ea6392c
Setting Up and Managing Profiles with Proxies
Assigning Proxies to Profiles
You can assign proxies while creating, editing, or managing profiles from the main screen. When setting up a new profile, navigate to the Proxy section. Here, you can either input new proxy details manually or choose from your saved proxies using the dropdown menu. If you’ve already added proxies under the Proxies tab, they’ll be available for quick selection.
For quicker updates, use the pencil icon in the Proxy column on the main profiles screen. This allows you to add or modify a proxy without opening the full edit menu, making the process much more efficient. Once a proxy is assigned, test it to verify the IP address, location, and timezone.
Working with Multiple Profiles
Managing multiple profiles can be simplified with proper organization. Use statuses, tags, and folders to keep everything structured. For example, you might group profiles by their purpose, such as "FB", "Google", or "Crypto", and filter them based on specific proxies. This setup is especially helpful when handling dozens of profiles at the same time, ensuring you can quickly identify which accounts are linked to which servers.
"The simplest rule that avoids headaches: 1 Dolphin profile -> 1 proxy endpoint. Keep that mapping stable unless you're intentionally rotating." - Proxies.sx
If you need to replicate a setup, the Copy Profile function lets you duplicate proxy configurations, with the option to randomize fingerprints. Deleted profiles are stored in a Basket for 48 hours, giving you a window to recover them if needed. Note that the free plan supports up to 10 profiles, while paid plans unlock bulk management tools like mass proxy editing.
After organizing your profiles, always test each proxy to ensure it’s working as expected.
Confirming Proxy Integration
To confirm that a proxy is properly integrated, click Start to launch the profile with the assigned proxy settings. Open an external IP checker, such as ipinfo.io, within the launched browser. The displayed IP address should match the proxy’s IP, not your actual location.
For mobile or rotating proxies, ensure the "Link to Change IP" feature is configured correctly. This will display an IP rotation button directly on the profiles screen, providing a clear indicator that the rotation feature is active. Additionally, the Proxy column includes status indicators, making it easy to check the health of your proxies across all profiles without needing to launch them individually.
Advanced Proxy Settings and Troubleshooting
Setting Up Rotating Proxies
Rotating proxies take the standard proxy setup a step further by dynamically switching IP addresses either per request or on a set schedule. This feature is especially useful for tasks like web scraping or data parsing, where handling large volumes of requests is key. Dolphin Anty supports rotating proxies through HTTP, SOCKS4, and SOCKS5 protocols.
To enable this feature, paste the rotation link into the "Link to change IP" field. Once set up, you can manually trigger an IP rotation using a dedicated button, all without needing to close your browser profile or interrupt your session.
Mobile proxies are particularly effective for rotation since their IPs frequently change due to carrier-based NAT. This makes them better at bypassing advanced anti-fraud measures. For optimal results, align the type of proxy with the profile's OS fingerprint - for instance, use mobile proxies with mobile profiles. However, avoid rotating IPs while logged into sensitive accounts, as this could raise security flags. Instead, rotate after finishing a batch of tasks or if you encounter rate-limiting.
If you're on a paid plan, you can use the Bulk Profile Control Panel to add or update rotating proxies across multiple profiles simultaneously.
Updating Existing Proxy Settings
Once your proxies are configured, you might need to tweak or refresh settings without disrupting ongoing workflows. To update a proxy, click the pencil icon in the Proxy column. This opens a quick-edit window where you can adjust credentials, change the host, or update the rotation link.
For bulk updates, paid plan users can select multiple profiles using checkboxes and then click "Change Proxy" from the bottom action bar. Alternatively, you can go to the dedicated Proxies section, edit the desired proxy's details, and save your changes.
If you need to refresh an IP during an active automation task, use the IP change button - this option is available if the "Link to change IP" is already configured. This allows you to switch the IP without closing the browser. After making any updates, always click the "Check Proxy" button (the arrows icon) to verify the new connection and credentials before launching the profile.
Fixing Common Proxy Problems
Proxy issues often arise from incorrect credentials or formatting errors. If the status shows "ERROR", double-check your login details and remove any extra spaces. Dolphin Anty supports these formats: host:port, host:port:login:password, or login:password@host:port.
| Issue | Likely Cause | Resolution |
|---|---|---|
| Status: "ERROR" | Wrong login or password | Re-enter credentials; check for extra spaces |
| Proxy column missing | Column is hidden | Click "Customize columns" and enable "Proxy" |
| Connection failed | Protocol mismatch | Verify protocol (HTTP/SOCKS) matches provider settings |
| Site detection/ban | OS or fingerprint mismatch | Match profile OS to your physical device OS |
Connection errors often happen when the proxy protocol (e.g., HTTP or SOCKS5) doesn't match the one required by your provider. Double-check your provider's settings to ensure compatibility. If a website detects or bans your profile, verify that the OS fingerprint in your profile matches the operating system of your physical device. For example, using a macOS fingerprint on a Windows PC can lead to detection due to font inconsistencies.
To confirm your proxy is working correctly, launch the profile and visit an external IP checker like browserleaks.com/ip. The IP displayed should match your proxy's IP, not your actual location.
Conclusion and Best Practices
Main Points to Remember
Here are some essential tips to keep your proxy usage smooth and secure:
- Stick to one proxy per profile. This helps maintain unique digital fingerprints and avoids linking multiple accounts. Also, ensure the profile's operating system matches your device to prevent any detectable mismatches.
- Use the correct proxy credential format - either
host:port:login:passwordorlogin:password@host:port. Always run the built-in check (the arrows icon) before launching profiles to confirm everything is set up correctly. - For tasks that require higher security, Elite proxies are a great choice as they completely hide your real IP address. If you’re using rotating or mobile proxies, make sure to add the "Link to change IP" option, so you can manually rotate the IP without ending your browser session.
- Avoid rotating IPs while logged into sensitive accounts. Instead, rotate your IP after completing task batches or when you hit rate limits.
- Use Smart Paste to simulate human typing and reduce the chances of bot detection. Additionally, deploy the Cookie Robot to establish initial cookie histories, which can help build trust with websites.
By following these practices, you’ll be better equipped to manage proxies effectively and securely.
Next Steps
Start by applying these strategies to fine-tune your proxy configurations:
- Test your setup using Dolphin Anty’s free plan, which supports up to 10 browser profiles. This is perfect for experimenting with low-risk tasks before scaling up.
- For larger operations, consider upgrading to a paid plan to unlock features like bulk proxy management.
- Keep the proxy column visible in your dashboard by clicking "Customize columns" and enabling the Proxy status field. This makes it easier to monitor your proxies at a glance.
- Enable Cloud Sync if you need access to your configured profiles across multiple devices.
- If you accidentally delete a proxy-linked profile, don’t worry - deleted profiles are stored in the Basket for 48 hours, giving you time to recover them if needed.
FAQs
What is the best way to choose the right type of proxy in Dolphin Anty?
To pick the right proxy type in Dolphin Anty, you’ll need to weigh your task requirements, the level of privacy you need, and your budget. Let’s break it down:
- Datacenter proxies: These are budget-friendly and work well for low-risk tasks like basic web scraping or accessing geo-restricted content. However, they’re more likely to get flagged by strict anti-fraud systems due to their predictable nature.
- Residential proxies: These proxies mimic regular home internet connections, making them a safer bet for tasks like managing multiple accounts or automating e-commerce activities. They’re less likely to trigger suspicion compared to datacenter proxies.
- Mobile proxies: If your workflow involves highly sensitive operations, mobile proxies provide the highest level of anonymity by routing your traffic through mobile networks. Keep in mind, though, that this level of security comes with a higher price tag.
A few tips to guide your choice:
- If you're dealing with websites that have strict anti-fraud measures, residential or mobile proxies are your best options.
- For tasks that need frequent IP changes, rotating residential or mobile proxies are ideal.
- Always test proxies for latency and success rates to ensure they meet your needs before committing to a larger scale.
By matching the type of proxy to your task’s specific demands, you can strike the perfect balance between privacy, performance, and cost for your Dolphin Anty automation projects.
How do I fix common proxy connection issues in Dolphin Anty?
If you’re running into issues with proxy connections in Dolphin Anty, the first step is to double-check your proxy details. Make sure the format is correct - this could be something like IP:port:username:password or socks5h://user:pass@host:port. Also, confirm that you’ve selected the right proxy type, whether it’s HTTP or SOCKS5. Additionally, ensure that tools like VPNs aren’t interfering with your connection.
Once your profile is saved, test the proxy by launching it and visiting an IP-checking site. This will help you verify if the displayed location matches your proxy setup. If the page doesn’t load or the IP address isn’t correct, take note of any error codes. For instance, a 407 error indicates authentication issues, while 502/503 errors typically suggest server problems or a blocked endpoint. In such cases, re-enter your credentials or switch to a different proxy.
For SOCKS5 residential or mobile proxies, be sure to use the correct endpoint and port - for example, gate.decodo.com with port 7000. If the problem continues, try restarting the profile or switching to another proxy type, like residential, datacenter, or mobile, to pinpoint the issue. Always test your changes on a neutral site to rule out any domain-specific restrictions.
How do I set up and connect a proxy to a Dolphin Anty browser profile?
To set up a proxy in a Dolphin Anty browser profile, begin by creating or editing a profile in the Browser Profiles section. During the setup, find the Proxy field and click on Add Proxy. From there, select the type of proxy you’re using - options include HTTP/HTTPS, SOCKS5, residential, datacenter, or mobile. Then, input the server details in the correct format, such as IP:Port or IP:Port:Login:Password. Be sure to double-check all credentials to avoid errors.
After adding the proxy details, save the profile and launch it. Open the browser and confirm the proxy is working by checking your IP address on a reliable website. If needed, tweak settings like proxy rotation or location filters before saving the profile again. These steps will help you configure the proxy correctly, ensuring smooth and secure automation tasks.